Showing posts with label 1-COSTUM INSTALLATION. Show all posts

Tuesday, February 14, 2012

0 Intel 82852/82855 Graphic Driver for Vista

Officially there are no drivers for intel 82852/82855 released for windows vista and windows 7. They are only available in windows XP. The trick that i always do with upgrading old models is install the XP driver in wndows vista using compatibility mode. Not only driver but this trick also work with windows 7.

1. Download the XP Driver form the manufacture (There are lower chance for the drievr to work if you download it from Intel).
example : Compaq V2000 Driver
(for compressed files, extract it first)

2. Right click on the driver select properties.

3. Select COMPATIBILITY.

4. Select run this program...'Windows XP'.

5. Right click again and select run as admin.

Tuesday, December 6, 2011

0 SATA Driver and Slipstreaming Guide

 NOTE: Link for sata drivers are dead,  I'm still working to fix it.
Update 1 : Link for nvidia sata fixed.
Update 2:  For intel User use this universal sata driver with guide: Download link

This guide will show you how to choose the right SATA driver to install Windows XP. . Also thanks to to other contributors especially Gustav Rock(CQ42) and Vanilla Blue (CQ40/CQ35/Acer).

NOTE:
1. Do this at your won risk.
2. You are recommended to make recovery first:
For windows Vista: Here
For Windows 7     : Here
Topics:

1. STEP 1: Install CPU-Z (to Identify the right SATA Driver)
2. STEP 2: Identify Your Chipset
3. STEP 3: Choosing the SATA Diver and Slipstream Guide.

Note. For certain model such as ACER 4530 please check on your BIOS to enable AHCI mode from IDE mode. Sometimes there are model which do not need to use SATA driver.

STEP 1 : Install CPU-Z

1. First you need to install CPU-Z in order to identify the right SATA Driver For you Model.
2. You can Download CPU-Z here: Download page
3.  Then Install it by double click on it.
4. Continue till installation finish.
5. Start CPU-Z


STEP 2: Identify your Chipset

1. At this point you should have CPU-Z installed in your system.
2. You will see a shortcut on your desktop and double click to run it.
3. Then select mainboard panel and look at the chipset. There you will see AMD or INTEL or Nvidia.

4. This information we will use to determine the right sata Driver for slipstreaming process.
5. Take note for the Chipset and continue to STEP 3.
6. Go  to step 3 For:
  • intel chipset go to A
  • AMD chipset go to B
  • Nvidia chipset go to C
STEP 3: Choosing SATA Driver and Slipstreaming GUIDE.

A: INTEL CHIPSET -:
1. HM65, HM67, UM67, QS67 or QM67
Download sata driver: Download

2. PM55, HM57, QM57 or QS57
Download sata driver: Download

3. HM55
Download sata driver: Download

4. GL40, GS40, GM45, GS45 or PM45
Download sata driver: Download

5. GL960, GML960, GM965 or PM965
Download sata driver: Download

6. 940GML, 943GML, 945GM, 945GMS, 945PM or 945GSE
Download sata driver: Download

7. NM10
Download sata driver: Download

Note: All the links above are dead, I still working to fix it, for now use this universal sata driver.
Download from intel: Link
Download Drivers only form mirror : Link
 

B: NVIDIA CHIPSET-:
1. For ION or ION LE chipset (HP Mini 311 and Compaq Mini 311c series models)

2. other Nvidia chipsets
Download sata driver: Download

- no sata driver and slipstream needed


C: AMD CHIPSET-:
For any AMD model use the same sata driver (additinal sata driver link included in the DOC file.
Download sata driver: Download

ADDITIONAL NOTES:

 For Cq41 AMD base model if AMD sata AhCI above didnt work use this one:
Download AMD sata CQ41 (link dead will fix it later)
This sata upload by kiwielz which tested on his CQ41-110AU

For INTEL if you have problem with sata above u may try this sata:
SATA AHCI10 for intel base model:
Download  (link dead will fix it later)

Only some ACER model and other model beside COMPAQ/HP need to slipstream the sata Driver.

PLEASE DO CHECK IN YOU BIOS FIRST!
IF THERE IS SATA MODE OPTIONS, CHANGE FROM IDE TO AHCI.

If the process failed and you want to repeat please delete all previous folder and start over again with new folder.
 _______________________________________________________________________
CREDITS:
Gustav Rock(CQ42)  - blogger
Vanilla Blue (CQ40/CQ35/Acer) - computer and peripherals maintenance
Rakhmad and CherylG - especially for AMD model - HP support forum
Daniel Potyrala - Compiling the guide - HP support Forum
Amy - User - CQ35 (wasted 15CD and 10 DVD) -  thanks for the great effort
Users that send feedback on original slipstreaming guide here 
Others who email me, test it and send feedback
 

Thursday, September 1, 2011

0 Conextant Audio Driver For Windows 7 64-bit

This guide made generally for all model, but the drivers made mostly for HP/compaq model. So if you ask me will this work for other model, the answer is YES but you need to get permission from HP so that your action is LEGAL. I do not hold any responsibility if you do it illegally, this post intend to help people who upgrading to Windows 7 64 bit and for tutorial purpose.

INTRODUCTION. (IMPORTANT TO READ)

Normally, in my post i just give a driver, or a simple tutorial to solve the problems. But there are lots of email i received asking how did i understand and know the solution. So i think it is important to describe the way to understand how to solve this problem. I normally didn't want to write a post in details because i know my English not really good so i always keep it short to avoid grammatical error. But i don't want to disappoint those who asked me. So I apologize in advance for my poor English.

There are many type of conextant audio. The way to distingush between them is by the HARDWARE ID(if you dont know what the hardware ID is, don't worry you'll get to it later). By names there are many of it;
-conextant smart audio 221
-Conextant Ac-link Audio
-Conextant High definition Audio
-Conextant AC97 Audio
-Conextant venice Audio
-conexant cx20671 Audio
-conexant cx20561Audio
and there is lot more, i just make the list of the popular names around the net. (i think there are no need for you to know all the list unless you are in this field, just pm me).

So the conclusion is there are many names, but the one differentiate between them is the hardware ID. So lets continue with the Installation for your driver.

1. IDENTIFY YOUR HARDWARE ID.

1. First, to get the right drivers, you need the hardware ID. to get the hardware id you can refer to my tutorial here:
http://laptop-driver.blogspot.com/2009/12/how-to-check-hardware-id.html

2. After you get the hardware ID you will get the result like this(the numbers different base on your device):

PCI\VEN_1002&DEV_4370&SUBSYS_3091103C&REV_02
PCI\VEN_1002&DEV_4370&SUBSYS_3091103C
PCI\VEN_1002&DEV_4370&CC_040100
PCI\VEN_1002&DEV_4370&CC_0401

3. Ok, from that list, pay attention to the line that i highlight, that is the important line to determine the hardware ID.  Note first line just added the &REV_02 , this addition &REV_02 added because you are using windows 7. So this is the reason why if you install using the windows XP or windows Vista driver directly it will failed, if you install manually from device manager some may success some may not because both xp and vista file doesn't contain &REV_02.
 variation may exist such as &REV_03 etc.The last line 3 and 4, the important line here to note is the number 1002 and 4370, this number show that this is audio type and it is conextant.

How to know the number in hardware ID represent what?
well just google it, many website contain information and database for this driver. That is why sometime realtek AC97 driver can be use to install driver for conextant ac link97 because both share the same ID. Some driver may have one or two ID, but some drivers may contain 100's compatible ID.

II . GETTING THE RIGHT AUDIO DRIVER FOR 64 BIT.

Ok, after you get the hardware ID, compare with the ID i gave below. Download and install the driver. Note that to install it you need to extract the driver (make sure winrar installed).
After that open the extracted folder. Right click at the setup file (exe: UIU.exe etc; name varies) and select run as admin and restart after installation finish.

1. Conextant 64 bit driver 1
PCI\VEN_1002&DEV_4370&SUBSYS_3091103C&REV_02
PCI\VEN_1002&DEV_4370&SUBSYS_3091103C
Download 

2. Conextant 64 bit driver 2
HDAUDIO\FUNC_01&VEN_14F1&DEV_5045&SUBSYS_103C30D9
Download

3.Conextant 64 bit driver 3
HDAUDIO\FUNC_01&VEN_14F1&DEV_5045&SUBSYS_103C30B5
HDAUDIO\FUNC_01&VEN_14F1&DEV_5045&SUBSYS_103C30CD
HDAUDIO\FUNC_01&VEN_14F1&DEV_5045&SUBSYS_103C30B2
Download

4. Conextant 64 bit driver 4
HDAUDIO\FUNC_01&VEN_14F1&DEV_5045&SUBSYS_103C30B7
HDAUDIO\FUNC_01&VEN_14F1&DEV_5045&SUBSYS_103C30BB
HDAUDIO\FUNC_01&VEN_14F1&DEV_5045&SUBSYS_103C30CF
Download

There are a lot of ID to cover but i list the most popular driver.
So if you didn't find your driver here just get the hardware ID for your audio and post in the comment section below. Ill help to find the appropriate driver.

_________________________________________
HARDWARE ID MATCH BUT INSTALL FAILED!

1. Ok if you try the driver above and failed do this:
-Open device manager (click start and type DEVMGMGT.MSC to open device manager).
-Right click on the audio with yellow and select update driver.
- Select browse my computer for drivers
- Select let me pick from a list of device drivers from my computer
-Select HAVE DISK and BROWSE
-Point to the extracted driver folder
-and select the INF file
-reboot

For those who have try many step in many website may read that SP38885 reported worked. but many not know that there are 2 version of SP38885, and the driver for the old one very hard to found.

Once again if you didn't find your driver here just get the hardware ID for your audio and post in the comment section below. Ill help to find the appropriate driver. To get the hardware ID refer nmy tutorial here:
http://laptop-driver.blogspot.com/2009/12/how-to-check-hardware-id.html

For a those who new to the driver stuff, it maybe hard for you to undrstand, but if you need my assistant to get the right drivers (because you don't understand well the method i post) i willing to do so. Just leave your comments.

0 Compaq Presario A900 Conextant Audio Windows XP Drivers (General guide)

So i have  to write this post especially for A900 series who have the problem to install audio drivers. So a brief and short intro. This model use Conextant audio drivers, there are many type of conextant audio devices such as conextant smart audio 221, coneextant ac link audio, and conextant venice, so this model tetsed work with conextant venice 5041 driver.

IMPORATNT:
There are overall total of 103 model for A900 model starting with A900 CTO, A900ED .... etc so not all of them use the same conextant driver. Here i will list several driver at the END of this post. So first try with the driver i recommended. If not work repeat the whole installation process using the other driver in the end of the post.

INSTALLING THE DRIVER.

A: INSTALLING MS_UAA


First download and install MS-UAA:
Download (sp33867) size 53MB

The above MS-UAA tested work, but the size to download is big, so you may also use this driver (i didn't test it yet but it also contain the 888111 article for MS-UAA)

UAA drivers (Must be installed before installing the audio driver):
Download
it strongly recomend to use win xp , or win xp sp2, but in case you use sp3;
MS-UAA for Windows XP SP3: Download (KB835221)

Restart after installation.

INSTALLING AUDIO DRIVER:

1. Download this driver:
Download (sp34386.exe)

2. Double click to run the installation, ignore if fail. The reason is to extract the driver file located at c:\SWsetup\SP34386

3. Open device manager by click start and select RUN. Type DEVMGMT.MSC and press enter.
(you can also press Windows button + R at the same time to open the RUN windows)


4. Then click "+" next to, Sound, video and game controllers to expand the list.


5. Right click on Conexant High Definition Audio with YELLOW mark or Audio with yellow mark. Select UPDATE DRIVER.

6. A Driver update windows will open. Select NO to connect and press NEXT.


7. Select 2nd option , ADVANCE - press NEXT.


8. Select Don't search i will choose the  driver to install.


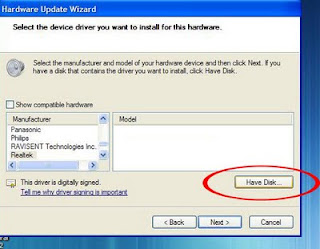
9. select next - HAVE DISK.(uncheck the show compatible hardware button)


10. Select Browse, the point to C:\SWsetup\SP34386 and select the WIS30B5a.inf.


11. Click ok - next and continue with on screen instruction. Ignore if it complaints.

_____________________________________________________

MODEM INSTALLATION:

So for modem download this driver:
Donwload (SP34777)double click to run the installation. ignore if it fail.

repeat the process like the audio driver except for the step 5 and 10.

STEP 5: Right click on MODEM with YELLOW mark . Select UPDATE DRIVER.
STEP 10:Select Browse, the point to C:\SWsetup\SP34777 and select the inf file.

________________________________________________________

IF AUDIO INSTALLATION FAILED.

So as i mention earlier, this model use the following driver:
Conextant Venice High Definition Audio Device (5045)

I failed, you need to repeat the whole audio installation process (no need to install ms-uaa again) try with any of this driver:

Download (SP34200)
Download (SP40762)

report back which work and if still failed. Get me the hardware ID for your model and post in the comments section below. Also remember t add any details, error that you think is important to let me know. For those who try, report which driver work for you and what is your model.

Wednesday, January 19, 2011

0 Compaq Presario CQ35 Windows XP Audio Driver and Installation

This Guide will show you how to manually install Audio Driver in CQ35 in Windows XP.

Contents:
================
I. Notes

II. File and Driver.

III. Extracting Files

IV. Installations
      a) Direct Install
      b) Manual Install
=================

I : NOTES
1. I strongly recommend using windows XP Service pack 2 (SP2). However for SP3 there are patch for you guys so you do not have to revert back to SP2.
2. Make sure you already install the chipset Driver. If not get it here:

II. FILE AND DRIVER

1. MS-UAA(filename: KB888111xpsp2_en):
Windows XP SP2: Download (KB888111)
Windows XP SP3: Download (KB835221)
   for xp sp3 recomend to install this MS-UAA: Download
2. IDT High definition Audio: IDT 92HD75B1/92HD75B2 @ Intel 82801IB ICH9 : Download
3. Patch (For win XP SP3) : Download
4. WinRar : to extract the driver files : Download - and install (chose the free version)
(if you already have it then no need for second time install)

Download all the file and put them together in folder. I suggest make a folder on your desktop and name it as CQ35 AUDIO.

III: Extracting Files

1. Now after you put all the files in a folder. Extract all the files. You need Winrar software to do that. look at the picture below.

So you will get 3. folders.


 OK, not all 3 folder we will use, we will use only the IDT audio folder later on in case direct install failed, and the AUDIODRV folder for win XP SP3. why I'm asking to extract all three? to make sure all driver package you downloaded are working, if you can't extract mean the file is corrupt (or due to unfinished download) so you need to re-download the files.

IV. INSTALLING THE DRIVERS

a) Direct install (if failed proceed to B)
1. Install MS-UAA (KB888111XPSP2-EN)by double click on it and restart.
2. Install Audio Drivers (double click on CQ35_IDTAudio_sp42717) and continue with on screen instruction.
3. restart and you sound should work. For XP sp3 apply patch and restart.

b) Manual Install
1. Make sure you already install MS-UAA and restart.
2. Open device manager by click start select run and type DEVMGMT.MSC and press OK

3. A device manager will appear, look at the Audio With yellow.


4. Right click on the audio with yellow mark and select update Driver.
5. Select no at the welcome to the hardware update wizard.

 6. Select Advance

 7. Select the last option ' don't search i will choose the driver to install.

8 . Select next and select have disk then select browse.


9. Now look at the driver folder and open the CQ35_IDT - WDM - WinXP  and select theSTHDA,INF file. (note: STHDA64 is for 64bit operating system)


10. Select open and ok, select next and ignore if it complaints.
11. Restart after finish.

Wednesday, December 15, 2010

0 Intel(R) PRO/Wireless 2200BG Windows 7 Driver

READ FIRST:
I found 4 drivers for  Intel(R) PRO/Wireless 2200BG for windows 7, Since there are two windows which is 32-bit (x86) and 64 bit (x64)

Here is the executable driver for both 64-bit and 32-bit. If you don't understand about 64 and 32 bit nevermind that, just make sure you  use windows 7. Thats all.

DRIVER:
Intel(R) PRO/Wireless 2200BG Windows 7 Driver
Well again the driver got deleted, 2 times i renew 2 times they delete it.
This driver from intel and so maybe i cannot upload it. So i will just show you how to download it.

1. Go to : http://downloadcenter.intel.com/
2. On the search box type : Intel PRO/Wireless 2200BG Network Connection

3. Select the vista drivers (see picture below.)

4. Download the drivers by clicking agree to the agreement.


INSTALLATION:
1. Ok, first of all you need winrar software to extract the driver you downloaded.

2. The driver files name is 11.5.1.2_VT_DRIVERS.zip, after finish download the driver, right click on the 11.5.1.2_VT_DRIVERS.zip  and select extract files, press ok, so you will get 11.5.1.2_VT_DRIVERS folder.

3.  Open the folder, browse until you find the v32 and v64 folder. Base on your operating system chose 32 or 64 bit.


4. Then right click on DPInst32.EXE or iProdifx.EXE and select propertis - compatibility -tick 'run this program in compatibility mode for - windows vista.

5. Right click again on both and select "run as admin".

6. Continue with on screen instruction.

If failed see manual installation below.


MANUAL INSTALLATION:

1. Download the driver, and extract it using winrar.
2. After that you will get the extracted folder. (i suggest extract it at desktop)
3. Now for advance user you may already know how to install driver manually from device manager.
4. OK we now will perform manual installation from device manager.
5. click start and on the search box type DEVMGMT.MSC the press enter , a device manager windows will open.

6. There look for network with yellow mark, or look for your wireless right click and select update driver.

7. Select next and the select browse my computer for driver software:

8. Select Don't search i will choose the driver to install.

9. Select HAVE DISK and Browse - point to the folder that we extract earlier until you find the NETw2.inf/NETw4v64.inf

10. Continue with on screen instruction.
 

Laptop Drivers Copyright © 2011 - |- Template created by O Pregador - |- Powered by Blogger Templates